
In this post we will walk through automating Disk Cleanup tasks in Windows 10 by using Group Policy and Scheduled Tasks. In Windows 10, you can start Disk Cleaner by selecting Start>Windows Administrative Tools>Disk Cleanup. You can also run Disk Cleanup from command line by typing cleanmgr and using several different switches to get different results.
The common switches we will be using are:
/sageset:n – This switch displays the Disk Cleanup Settings dialog box and creates a registry key to store the settings you select. The n value is stored in the registry and allows you to specify different tasks for Disk Cleanup to run. The n value can be any integer value from 0 to 65535. To get all the available options when you use the /sageset switch, you may need to specify the drive letter that contains the Windows installation by using the /d [driveletter] switch.
/sagerun:n – This switch runs the specified tasks that are assigned to the n value by using the /sageset switch. All drives in the computer will be enumerated, and the selected profile will be run against each drive.
So lets run through an example
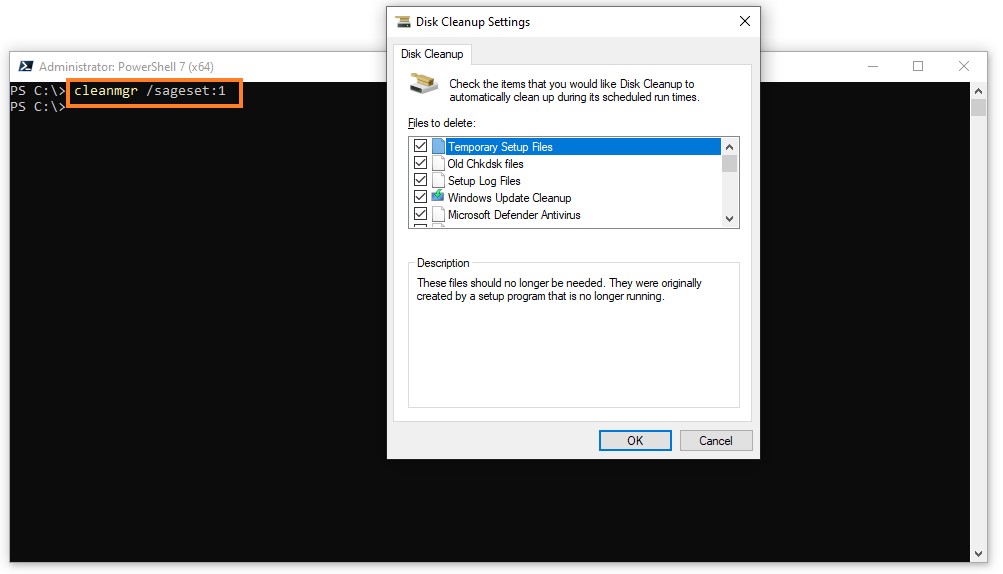
- Open Command Prompt or PowerShell and type cleanmgr /sageset:1
- The Disk Cleanup Settings dialog box will popup and you can select which files you want delete by checking the boxes
- Once you are done, click OK
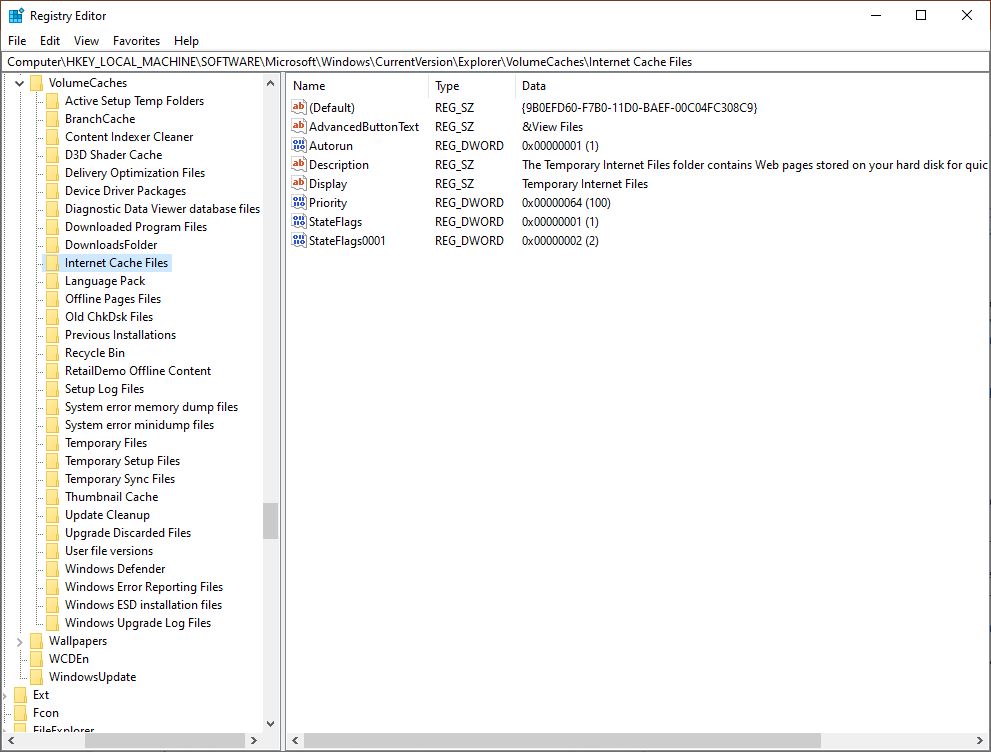
- Open Registry Editor and navigate to HKEY_LOCAL_MACHINE\SOFTWARE\Microsoft\Windows\CurrentVersion\Explorer\VolumeCaches
- Here you will see folders referencing those files to delete. Click on one of the folders you chose in the Disk Cleanup utility and you should see a new DWORD entry for StateFlags0001 with a value of 2
- Name: The 0001 is the number you chose when typing sageset:1
- Values: 2 is enabled. 0 is disabled
- At this point you can type cleanmgr /sagerun:1 and it will run the Disk Cleanup utility with the parameters you set in StateFlags0001
This is fine for a local machine but what about a large scale deployment? For this we will be using Group Policy.
Group Policy for Registry Values
If the parameters you have set in sageset:1 are the same you wish to deploy to your environment then we can actually continue to Group Policy Management (gpmc.msc). In the Group Policy Management console, go ahead and create a new GPO and link it to the OU of your choice. Click Edit on the GPO and follow the steps below.
- Select Computer Configuration>Preferences>Windows Settings>Registry
- Right click Registry and choose New>Registry Wizard and click Next
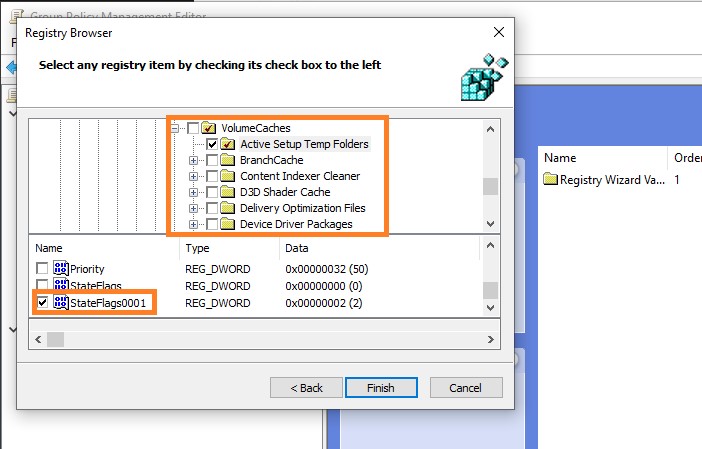
- Drill down to HKEY_LOCAL_MACHINE\SOFTWARE\Microsoft\Windows\CurrentVersion\Explorer\VolumeCaches
- For each setting you want to deploy, click on the folder and click the box next to StateFlags0001 as shown below and click Finish
Group Policy for Scheduled Tasks
You can add the scheduled task to the same GPO if you wish or make a separate one. Here we will define the schedule for when the Disk Cleanup utility will run.
- Click Computer Configuration>Preferences>Control Panel Settings>Scheduled Tasks
- Right click Scheduled Tasks and click New>Scheduled Task
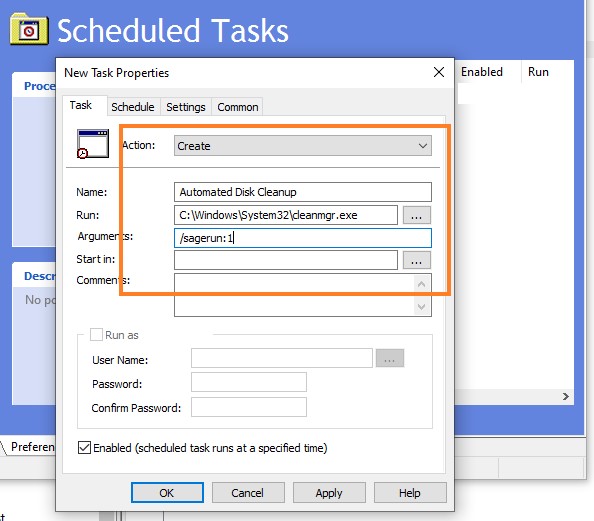
- Add a name for this task and set the schedule you wish
- For Run, navigate to C:\Windows\System32\cleanmgr.exe
- For Arguments, type /sagerun:1
- Click OK when finished
Test and Logs
You can wait for your Group Policy to update or you can force an update to test by typing in the command gpupdate /force using Command Prompt or PowerShell. To verify the GPO has been applied to the machine, run gpresult /h c:\gpresult.html. This will export an HTML file to the C drive and you check to make sure the GPO has been applied to the machine.
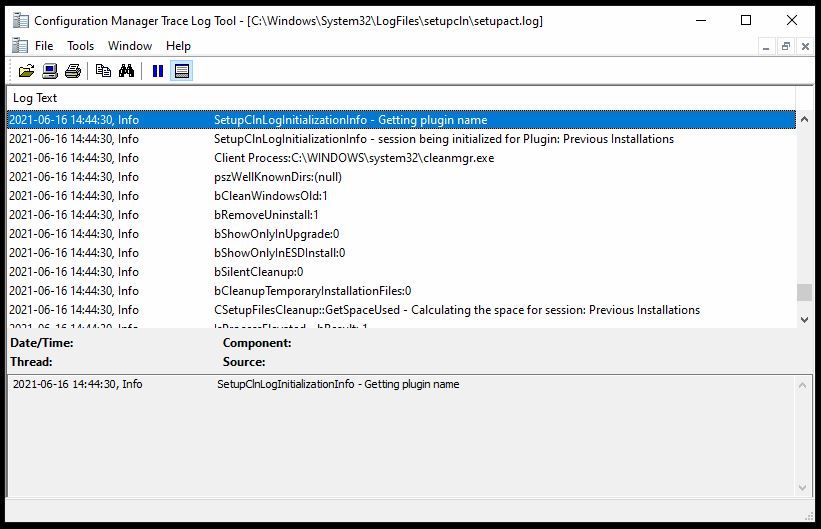
To verify the Disk Cleanup utility has been run you can use two log files located in C:\Windows\System32\LogFiles\setupcln:
setupact.log
setuperr.log
These log files have to be opened as Administrator. Using your log tool of choice, make sure you run as Administrator. As you can see, the Disk Cleanup utility is running with the parameters we set earlier.
For more information related to automating Disk Cleanup, click here. For more information on the Disk Cleanup utility itself, click here.

