It’s no secret that ransomware attacks are on the rise globally. According to the National Security Institute, experts estimate that a ransomware attack will occur every 11 seconds in 2021. These are scary numbers. Naturally, keeping your infrastructure patched and updated is critical and should be taken seriously. Recently, it was announced with CVE-2021-22005 that a critical file upload vulnerability in the vCenter Server could allow a malicious actor with network access to port 443 to exploit and execute code by uploading a specially crafted file. In response to this, VMware announced a patch with the release of vCenter Server 7.0 Update 2c.
In our environment, we were still using 7.0 Update 2a. A few days after the release of Update 2c, Update 2d was released by VMware, so I went ahead and staged the upgrade for after hours and proceeded with the install. After upgrading to vCenter Server 7.0 U2d, we are getting an error “[500] An error occurred while fetching identity providers. Try again” when trying to launch vCenter. I thought this may have been resource related so I allowed it some time to settle but after an hour we were still getting the same error. A couple of restarts of the VCSA and ESXi host didn’t help either.

We are still able to get to vCenter Server Management, however.
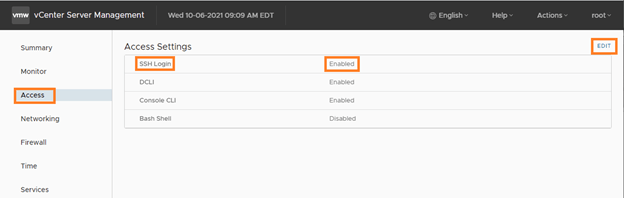
After some research it seems the issue is related to the Single Sign-On Security Token Service (STS) signing certificate. The STS signing certificate is issued by VMCA but we will need to replace the STS signing certificate using command line at this point. Once you are logged into vCenter Server Management, go ahead and navigate to the Access tab and enable SSH Login by clicking the Edit button.
Open a SSH terminal and connect to your VCSA IP address or FQDN through SSH port 22. Login as root and enter in your password.
Once at the Command line, type shell to grant shell access.
The first thing we need to do is create a new directory and copy the certool.cfg file to the new directory for editing.
1. To create the new directory, type the following commands
mkdir newsts
cd newsts
pwd
#resulting output: /root/newsts
2. To copy the certool.cfg file into the new directory we just created we will need to go up one level so type the following commands
cd
cp /usr/lib/vmware-vmca/share/config/certool.cfg /root/newsts
3. Now we will be using the vim utility built into Putty to edit the certool.cfg file. To enter the vim utility, type the following command
vim /root/newsts/certool.cfg
The screen should switch to an editor, it may seem weird since you will not be able to type yet. If you are unfamiliar with vim, refer to the quick notes below:
To enter INSERT mode (editing a file), you will type the letter i or press the Insert key on your keyboard
To exit INSERT mode (non-editable), you will press the ESC key on your keyboard
To exit vim without saving changes, type :q!
To save changes and exit vim, type :wq
3. We will be editing the vCenter Server IP address and hostname. Press the Insert key on your keyboard to edit the file. Make the necessary changes and press the ESC key to exit out of Insert (editing) mode. To save the file, type :wq
#
# Template file for a CSR request
#
# Country is needed and has to be 2 characters
Country = US
Name = STS
Organization = ExampleInc
OrgUnit = ExampleInc Dev
State = Indiana
Locality = Indianapolis
IPAddress = 10.0.1.32
Email = chen@exampleinc.com
Hostname = homecenter.exampleinc.local
4. After editing the certool.cfg file and typing :wq to exit the vim utility, we will be generating a new key. Type the following command
/usr/lib/vmware-vmca/bin/certool --server localhost --genkey --privkey=/root/newsts/sts.key --pubkey=/root/newsts/sts.pub
5. Next, we will generate the certificate. Type the following command
/usr/lib/vmware-vmca/bin/certool --gencert --cert=/root/newsts/newsts.cer --privkey=/root/newsts/sts.key --config=/root/newsts/certool.cfg
6. Now, we will create a PEM file with the certificate chain and private key. Type the following commands to go to the newsts directory and back to root
cd newsts
cat newsts.cer /var/lib/vmware/vmca/root.cer sts.key > newsts.pem
cd
7. Next, we will update the STS signing certificate. Type the following command
/opt/vmware/bin/sso-config.sh -set_signing_cert -t vsphere.local /root/newsts/newsts.pem
8. Now, we will reboot the vCenter Server so that both the STS service and vSphere Client are restarted. Type the following command
reboot
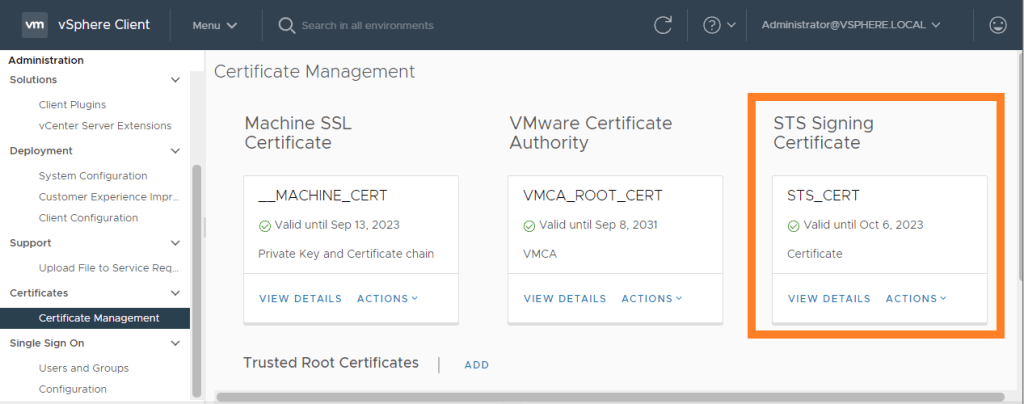
This should take care of the error and vCenter should be operational again. To verify the STS signing certificate has renewed with the new values you specified, login to the vCenter Server Appliance and click on Menu>Administration>Certificate Management. Click on View Details to see the new values.
For more information related to STS, click here.
For more information related to replacing the STS signing certificate, click here.

