Today, several of our VM’s were shut down on a single host. When I walked over to check on the host, I noticed the purple diagnostic screen below.
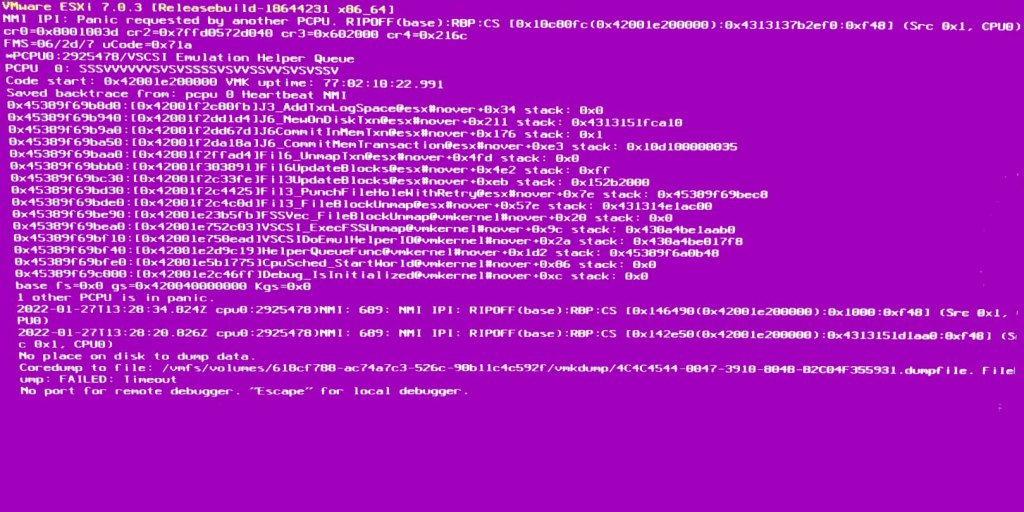
When researching the error, I found this VMware article. I will paste the cause as explained by VMware:
In ESXi 7.0.3 release VMFS added a change to have uniform UNMAP granularities across VMFS & SE Sparse snapshot. As a part of this change maximum UNMAP granularity reported by VMFS was adjusted to 2GB. A TRIM/UNMAP request of 2GB issued from Guest OS can in rare situations result in a VMFS metadata transaction requiring lock acquisition of a large number of resource clusters (greater then 50 resources) which is not handled correctly in resulting in an ESXi PSOD. VMFS metadata transaction requiring lock actions on greater then 50 resource clusters is not common and can happen on aged datastores. This concern only impacts Thin Provisioned VMDKs, Thick, and Eager Zero Thick VMDKs are not impacted.
VMware came out with a fix for this issue in vSphere ESXi 7.0 U3a and U3b. Unfortunately, these updates are no longer available due to several critical issues identified within them.
Workarounds
VMware provides 3 workarounds for this issue.
1. Revert to the previous version of ESXi that is not impacted by this concern.
2. Convert thin VMDKs to Thick or EZT provisioning
3. Disable TRIM/UNMAP in the Guest OS
Convert Thin to Thick Provisioning
For this post, we will be working on converting our disks from thin to thick provisioning since all of our virtual machines are currently set to thin provision.
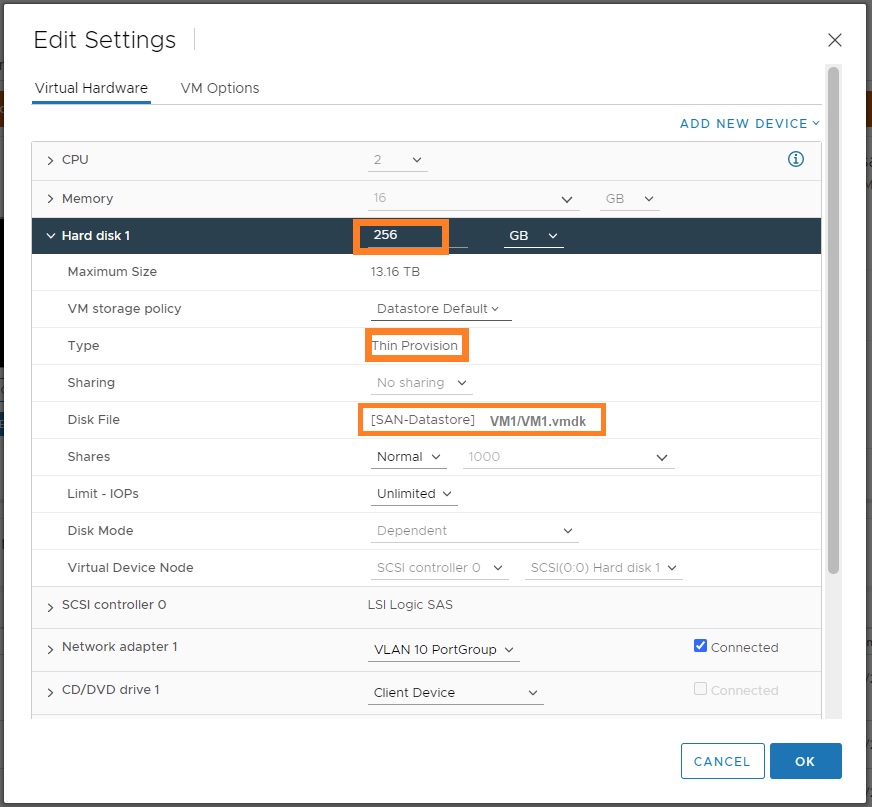
To do this, we first need to verify the type of hard disk and also the name of the disk file we will be converting. Navigate to the VM in question go to Edit Settings to view the details.
Navigate to the datastore where the VM resides. Click on the VM and choose Files. Once you identify the .vmdk Virtual Disk file, click on Inflate.
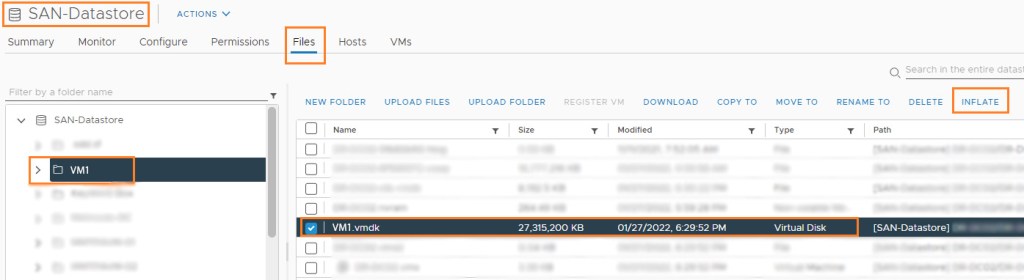
Once you select the Inflate option, you should notice a Task starting. This process can usually take up to an hour depending on the performance of the array.
If the Inflate option is greyed out, it means the VM is not powered off.
For more information on changing disk types, follow this link.
Reload VMX File
After the task is complete, you may notice that the disk type is still showing as thin provisioned. If this is the case, we will need to reload the vmx file. To reload the vmx file of a VM we need to identify the vim number. We can accomplish this by connecting to the ESXi host through SSH.
Once you are connected to the ESXi host through an SSH terminal, type the following command to identify the vmid # of the machine:
vim-cmd vmsvc/getallvms
[root@ESXi:~] vim-cmd vmsvc/getallvms
Vmid Name File Guest OS Version
1 VM1 [SAN-Datastore] VM1/VM1.vmx windows8_64Guest vmx-19
2 VM2 [SAN-Datastore] VM2/VM2.vmx windows9_64Guest vmx-19
3 VM3 [SAN-Datastore] VM3/VM3.vmx windows9_64Guest vmx-19
4 VM4 [SAN-Datastore] VM4/VM4.vmx windows8_64Guest vmx-19
[root@ESXi-3:~] vim-cmd vmsvc/reload 1
Once you have the vmid of the machine in question, type the following command to reload:
vim-cmd vmsvc/reload vmid#
For more information on reloading vmx files, follow this link.

