
I was tasked with adding hundreds of new members to a distribution list. Normally, this would be as easy as copying/pasting the user logon names (ex: user) or the UserPrincipalName or UPN (ex: user@domain.com) and running Check Names in Active Directory. Unfortunately, the only identifier that was provided to me was the email address. Like many other environments, our email addresses don’t always match the UserPrincipalName so the Check Names feature came up short this time. There are probably other ways of getting the information I need, but I thought it would be fun to try to extract the UPN using only the email address provided through PowerShell commands.
We have a hybrid Exchange environment running Exchange Server 2019 and Exchange Online so there will be two commands needed. One for on-prem mailboxes hosted on Exchange Server and one for remote mailboxes hosted in Exchange Online. I will be using the Exchange Management Shell for this exercise. Lets first run the Get-Mailbox command to see what information is given to us.
On the Exchange Server, open the Exchange Management Shell and type “Get-Mailbox EmailAddress“:
From the Get-Mailbox command, you can see that the following fields are provided:
- Name
- Alias
- ServerName
- ProhibitSendQuota
That’s nice, but it’s not what we are looking for. Let’s try to filter out the information that we want by formatting a table with the properties that we need. Type the following command:
Get-Mailbox EmailAddress | ft alias,primarysmtpaddress,userprincipalname

As you can see, the UPN for this user is different than the Primary SMTP Address. Now, lets find a way to import the list of users in the CSV file and get the same results like above. Let’s try the code below:
Import-CSV C:\Temp\csvfilename.csv | foreach {
Get-Mailbox $_.EmailAddress | ft alias,primarysmtpaddress,userprincipalname }
Let’s break this script down. First we are importing a CSV file that has one column of user email addresses. The column has a header named EmailAddress. You can name the column whatever you want, just make sure to adjust the script. Next, we will use the foreach { command } loop to run Get-Mailbox on each user in that column. After the Get-Mailbox command, you see $_.EmailAddress. The $_. argument simply means, THIS item. We are calling the entire column of EmailAddress. Finally, we are again formatting a table with the properties that we want to see with ft.
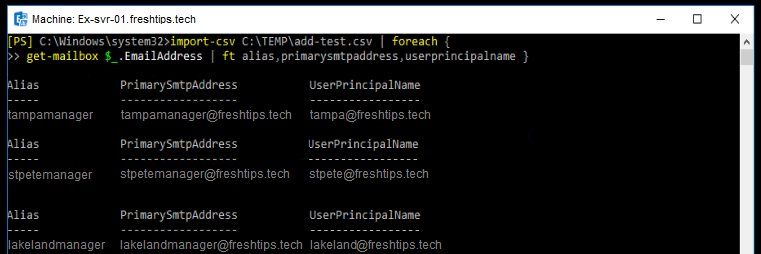
Now that we see have the full script showing the results we want, let’s export this new list to a new CSV file. To export, we will need to alter the script a bit first. The format table command only works for the PowerShell window. To export the new list, we will need to change ft to Select-Object. After we change that, you can just add a new pipe | directly after the foreach { command } loop. A pipe | just moves a previous commands results to the next command.
Import-CSV C:\Temp\csvfilename.csv | foreach {
Get-Mailbox $_.EmailAddress | Select-Object alias,primarysmtpaddress,userprincipalname } |
Export-CSV C:\Temp\output.csv -NoTypeInformation
-NoTypeInformation simply eliminates the #Type header that shows up in exported csv files from PowerShell. Every object in PowerShell has a TypeName and when you export to a CSV, the #Type will be added into the CSV file as well unless we use the -NoTypeInformation argument.
To get the results for a remote mailbox (365/Exchange Online), simply alter the command from Get-Mailbox to Get-RemoteMailbox.

